Some details before starting ...
♦ I believe that you still minimal handling Blender before and you do not fully begin, although manipulate an animation is not that hard. But even if this is not the case, I will detail my many explanations and explain the functions of the software so do not be afraid!
♦ It often happens to me to talk about poses and animations. In fact, it's the same: an installation is considered an animation in the game, except that it is fixed. Still not knowing how a real animation, I do not speak in that poses.
♦ The poses that you create for adults are suitable for teens.
I) What you'll need
♦ The PosePlayer of cmomoney
♦ The PosePackCreator of cmomoney
♦ The latest version of S3PE
♦ The 2.63 version of Blender
♦ The CLIPTool
In my goodness, I wanted to, for convenience, gather everything needed in a single archive with records well made, it will be enough to extract:
Pack Creating Poses - Blender. (S3PE in 32 bits, the Cliptool the PosePackCreator, The Rigs for Blender)
Your hardware is ready? Now we can tackle the serious stuff!
The procedure will differ significantly for the next two parts depending on the software you use.
II) Installer le plugin sur Blender
Before anything else, you 'll need to install using Blender pluggin needed to manipulate animations. To do this, turn Blender , then go to File and User Preferences (1).
In the window that just opened , go to the Addons tab (2) and down to the center of the window , click the Install Addon button ... ( 3 ) to install the plugin. So you need to get the plugin file , find the folder where you saved the file and select CLIPTool io_s3py_animation - 1.52.zip (4). If you downloaded the pack , it should be in the subfolder Creating Pose Pack - Blender \ Software \ ClipTOOL .
To verify that the addon is installed correctly , type in the field to the far left of the tab addon letters S3PY (5). You should normally be just right written Import- Export: S3PY Animation Tools (6). You must check the small cross on the right to activate the addon. If you move the file containing the plugin , do not forget to re - tell Blender where to find it !
Once the plugin is installed, you can start creating your pose!


III) Create your pose ... Blender.


Turn Blender. Go to File, then Open. Look where you saved your Rigs. If you downloaded the pack, they are in Pack Création de Pose - Blender\Rigs. To select the correct file, it will depend on the type of poses you want to create, so little decryption.
Apart from the first file, all the names are XYRig.blend.
♦ The first caratère X is a function of the age of sims concerned. a is an adult (and also teenagers / young adults and seniors to humans), c children or young animals and p toddlers.
♦ The second character Y is sex involved or hope. m for men, for women f u sims for any sex (for children and toddlers), for the dogs, for big dogs of c for cats, h for horses and b for the doe.
For example, to create an adult man poses, select amRig.blend.
Clone your animation file
There are two different ways to get them, find the one that best suits you.
1) Find the animation in the EA folder
Start by opening S3PE.
Make sure that those are your settings:
- Sort must be checked so that you can see things in alphabetical order
- Preview must be set to Value
- Display by Names

Go to "File > Open..." or CTRL+O there as well.
You need to locate the FullBuild0.package which is normally situated in this directory:
C:/Program Files/Electronic Arts/The Sims 3/GameData/Shared/Packages/FullBuild0.package
Important: Do not forget to check "Open as read-only" before pressing "Open"
C:/Program Files/Electronic Arts/The Sims 3/GameData/Shared/Packages/FullBuild0.package
Important: Do not forget to check "Open as read-only" before pressing "Open"

Now let S3PE starts loading the ressources, it might take a while but you can see the progression at the bottom. When the list will finally show up, we will use the search so we won't have to scroll through the whole page.
Now the name you will enter depends on the rig you decided to chose:
- adult/teenager male and female use the a_xevt_701 animation file
- child male and female will use the c_xevt_701 animation file
- toddler male and female use p_xevt_701 animation file
As for the pets, they are located in another folder:
C:/Program Files/Electronic Arts/The Sims 3 Pets/GameData/Shared/Packages/FullBuild0_p10.package
- cat you can use ac_simbin_simpose_neutral01
- small breed dog you can use al_simbin_simpose_neutral01
- large breed dog you can use ad_simbin_simpose_neutral01
- horse you can use ah_simbin_simpose_neutral01
In the bottom part, type in the name of the animation you are looking for.
Remember to use the animation that is related to the rig you used.
I used an adult male rig, so I need to download the adult animation.
Once you have written the name, make sure to check the mark in the box next to it, and then press the set button. It will copy the name on the lower case. Now you can check to activate the filter on the left, it will make the screen load once more and here is what I get after:

Now that only the file that we need appears on the screen, right click it and choose "Export and rename..."at the bottom of the list.

In the pop up window, insert a unique name as it will be the one people will need to type in game to play your pose. Most creators use their name or part of it to make sure there won't be any conflict with someone else's pose.

Make sure that you save it in a place that you will find easily, preferably in a folder where you can add anything you will need, without mixing them with other unrelated files.

You will now see in your folder a file with the .animation extension. You are ready to start your pose, but before that I will show another way to get this animation file more easily and faster.
2) Or you can use a previously cloned file
For this you will need to actually clone the animation file like previously explained, keep this in a safe place with a name such as "a_adult_base" and use it as a base for cloning each time you want to create a new pose. Or you could use the nice file Kaleeko compiled which includes all sims and pets animation file for you to use whenever needed and that you can find here.
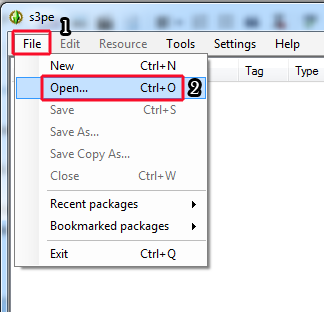
Open S3PE like you previously did, "File > Open..." or CTRL+O.
Browse to where you saved the file. If you placed it like me, it would be on your desktop, in the pose folder next to the rigs .
Of course, no matter how many times I try to load it now I don't get the message I usually have, but if you get a pop up asking you about replacing duplicates, press ok (or import I forgot, I will update this next time it asks me). It should then ask you if it should auto-save after importing, select no.
You should now see this screen:
For this you will need to actually clone the animation file like previously explained, keep this in a safe place with a name such as "a_adult_base" and use it as a base for cloning each time you want to create a new pose. Or you could use the nice file Kaleeko compiled which includes all sims and pets animation file for you to use whenever needed and that you can find here.
Open S3PE like you previously did, "File > Open..." or CTRL+O.
Browse to where you saved the file. If you placed it like me, it would be on your desktop, in the pose folder next to the rigs .
Of course, no matter how many times I try to load it now I don't get the message I usually have, but if you get a pop up asking you about replacing duplicates, press ok (or import I forgot, I will update this next time it asks me). It should then ask you if it should auto-save after importing, select no.
You should now see this screen:
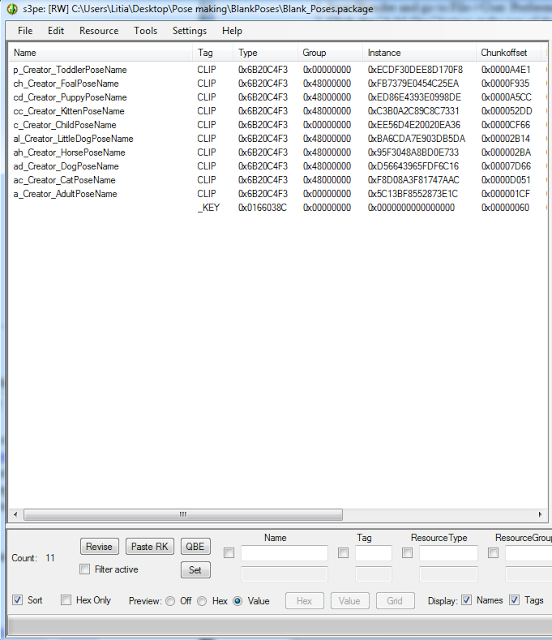
The names are pretty explicit. Like in the previous example, right click the animation file you want to use, then select 'export and rename'. For my example I would have exported the "a_Creator_AdultPoseName" and renamed it "a_Kilhian_MaleTutorial".
You can close S3PE for now, you won't be needing it again before you are ready to try your pose.
You can close S3PE for now, you won't be needing it again before you are ready to try your pose.

Cliquez ici pour modifier.
Before handling, make sure you are in Pose Mode, and it said at the bottom center of the screen.
Now you can go to the concrete realization of the mesh. History to guide a bit, here are a some features that can be very useful.
Move the view.
♦ To rotate the view, hold the wheel on your mouse button in the 3D view, and move your mouse.
♦ To move the view, hold down the mouse wheel and SHIFT key (the up arrow at the far left of the keyboard) simultaneously in the 3D view, and move your mouse.
♦ For specific points of view: press 1 on the numeric keypad to get a front view, 3 for a side view, and 7 for a view from above. For views in the other direction, hold CTRL together: for example, CTRL +1 gives a back view.

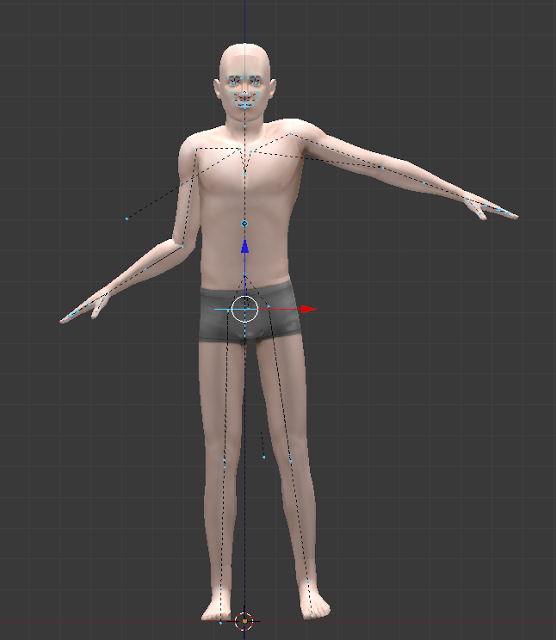
Select joints.
♦ You can select directly from the 3D view, simply by right clicking on one of the small spheres. It will glow blue sign that it is selected.
♦ You can also select the joints based on their name. To do this in the right column, click on the small side of amRig more, then the next to the Pose. By clicking successively on these extras, you have access to the entire list of joints. to select one, click on the little bone next to his name
♦ Press the A key on the keyboard to select or deselect all of the joints. If they are selected, they all light up in blue.

Manipulate joints.
♦ To rotate the joint that you select , press the R key on your keyboard . Thus , moving the mouse, you 'll be able to rotate around an axis perpendicular to your view.
♦ To move the joint that you select ( mostly very useful in case you handle facial expression ) , hold down the right mouse button down and move . Or simply press the G key on the keyboard and move .
♦ To move the entire model , click on the link in the middle of the pool and move it : your entire model would normally travel with . ( third image )
Remember to undo an action , you can click CTRL + Z
It seems to me that complicated further detail this part : all I can advise is to take the time to understand the software, and the movement of the joints , you will certainly be a bit of practice before ' get the results you want, and create static poses too realistic and expressive , but it is far from insurmountable !
Now comes the fun! I will try to describe things as much as I can, let me know if you need precisions about something and I will either edit it or put extra informations in part IV.
So one thing you want to know about is the joint named b_ROOT_bind_
You can see the name of the selected joint at the bottom left of the screen you work in.
It's a bit different of the others and you will easily find it around the lower stomach, there is like two lines crossing over it that will get light blue as well when you select it.

This is the joint that will let you move the whole body around.
Press the G key (G is for GRAB if it can help you remember) and move your mouse around to see how it will affect the body. Once you have found the correct position you wanted left click with your mouse and it will stay in place. If you want to modify it, either push G again or undo it with CTRL+Z
-This part here is a bit more advanced, you can skip it for now-
If you want to move your body around but make sure the feet will stay on the ground, press G then X or Y before moving your mouse. You will have to turn your view point with 3 or CTRL+3 to see the move while using the Y axis though. You won't need this if you do a single pose, but if you use an accessory or a couple/group pose it will be helpful.
You can find the axis on the top right part of the screen.

By using G and Z I lowered the body to make it low enough that it can sit on the ground. Try to remember that you have to keep your character slightly elevated. Leave a small space under your character for clothes, shoes, floor, rug, ...

Now I could either get the legs higher to rest on the floor, making him sit or lay on the ground.
For any of those two actions we will have to use the R key (R is for Rotate).
If I want to make him lay on the floor, I will keep the b_ROOT_bind joint selected, and I will change it to the right or left side view (so either 3 or CTRL+3) to control the movement more precisely.
The black arrows, showing the movement, are following your mouse. Even though you cannot see mine, you will see yours, and those arrows will show you what I am doing.

If you keep the mouse to close to the joint while trying to rotate you won't have much control over it. Don't panic and pull your mouse further until you can control it. Now seeing the body stiff like this looks more like a body at the morgue than someone laying/sleeping. We will have to do adjustments to make it look more natural.
I will keep the body lying down for now, so I will chose the view top and press 7 on my keypad, but if you would rather go back to a standing position like the one you started with, just undo the whole changes untill you get there with CTRL+Z.
I will keep the body lying down for now, so I will chose the view top and press 7 on my keypad, but if you would rather go back to a standing position like the one you started with, just undo the whole changes untill you get there with CTRL+Z.

As you can see by the top left left name of the view, and the top right part, the body is lying.
It would probably be a lot easier to control the changes from the starting position, create your pose then rotate the body and pull it to rest on the ground, but I am trying to show different combinations.
Let's try to move the arms closer to the body to make it look 'better'. I will select the left shoulder joint, and if it's easier to work with I will press .DEL to center the view on the joint, then zoom in or out till I am comfortable with the view.
Now here is something you might want to remember:
If you press R once and then move your mouse, the arm will move laterally. From a side view it would go up and down. But if you press R a second time, it will move inside/out.
It will give a more natural look, and the pose won't be as stiff or stretched.

I selected the right shoulder joint and rotated it from a side view.

If you press a joint and the body becomes deformed, you might have selected the wrong one. Pres escape to cancel and right click again to activate the good joint (mostly in the shoulders and eyes area).
Let's take a look at the hand/fingers.
Let's take a look at the hand/fingers.

You can see the wrist joint at the base.
From here the first joint will move the whole finger, the second joint will move the upper parts, and the third will move the tip only. Play around with pressing R once or twice until you get the position you want, and if the finger gets distorted try moving the mouse around and further from the joint until it looks better. Look at your own hand if it can help you find the correct angle, and use different point of views.
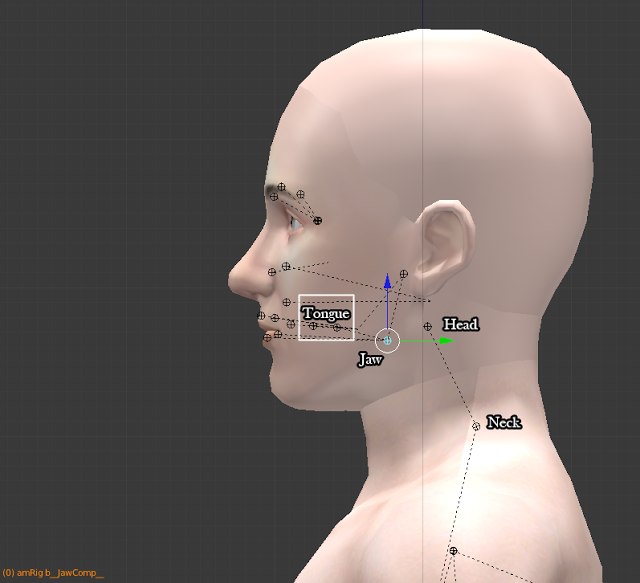
The face has a lot of joints you can use as well.
From here the first joint will move the whole finger, the second joint will move the upper parts, and the third will move the tip only. Play around with pressing R once or twice until you get the position you want, and if the finger gets distorted try moving the mouse around and further from the joint until it looks better. Look at your own hand if it can help you find the correct angle, and use different point of views.
The face has a lot of joints you can use as well.

- Try to grab (G) the eyebrows and move them to fit the expression you are looking for.
- Rotate (R) twice to position the eye (to the side, to look higher/lower, ...).
- Right click once more where the eye joint is to access the upper lid so you can press R twice as well to move the lid down on the eye (you can close it completely that way). Right click another time and you will access the lower lid.
- Use rotate for the corners of the mouth and the lip joints in between as well to work on a smile or any other emotion such as surprise, anger, ...
Under the lower lip joint you will find the jaw joint (by right clicking another time), but you can also find it by changing the view to the side, which will also show you the head joint. Use head and neck joint to move the head.
Here are the main joints to move for the body:
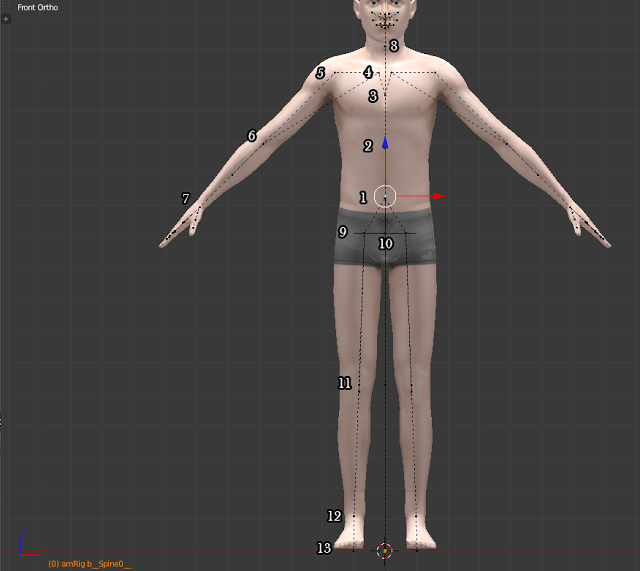
1 - pelvis
1b - 2 - 3 spine: use them to bend the top part of the body
4 - clavicle: mostly moved up or down but can be rotated to get a more smooth movement of the arms
5 - shoulder: moves the whole arm (select the UpperArm joint, not ShoulderTwist)
6 - elbow
7 - wrist
8 - neck
9 - thigh: moves the whole leg
10 - root: use to get the whole body lower, to lay down, ...
11 - knee (select the Calf joint)
12 - ankle
13 - toe
Try everything out and see how it looks. Remember that the further your mouse is from the joint, the more control you have on the movement. Always try to make your pose seem natural, and if you distort a joint try to move it differently or in another direction.
Set the keyframe
Once you have finished your pose, you have to set the keyframe. If when you try your pose in game the character just stands with their arms extended, chances are you skipped this step.
Keep at least one of the joint selected, then press the A button twice. The whole body joints will now be a light blue.
I know it's a silly pose, I just needed something basic for the tutorial.
Now that the entire body is selected, press the I key and do not move your mouse out of the popup or it will disappear. Select LocRot to set the keyframe.
Now that the entire body is selected, press the I key and do not move your mouse out of the popup or it will disappear. Select LocRot to set the keyframe.

Now the menu showing the joints name on the left side will show expanded.
You can now go ahead and export the animation.
You can now go ahead and export the animation.
Export the pose as animation
From the top left menu, select "File > Export > Sims 3 Animation"
From the top left menu, select "File > Export > Sims 3 Animation"

Another small popup box asks you to type a name. Insert the name for your pose, you cannot change it once you have set it or the pose will be affected in game.

Once you have chosen a name it asks for a location to save it. It should actually open the folder you loaded your animation file from, so select it then press the "Save Sims 3 Animation" button.

You are now done here.
Package the animation in S3PE
Reopen S3PE. From the top menu, select "File > New" or CTRL+N.
You can either click "Ressource > Import > From file..." or right click the left side of the screen and you will be able to see the Import option.
Package the animation in S3PE
Reopen S3PE. From the top menu, select "File > New" or CTRL+N.
You can either click "Ressource > Import > From file..." or right click the left side of the screen and you will be able to see the Import option.

Browse your computer to locate the folder where your animation is. There will now be two files as a backup was created, use the one that you just created, not the backup.

Another small popup window will open. Don't change anything and just press OK.

The main window will show your pose with the CLIP tag.

To create a package with several poses, select "Import > From file..." and keep adding as many as you want in the pack. Use Cmomoney's pose pack creator to make it list compatible, CloudwalkerNZ added pictures to the tutorial How to manually add the pose tags.
Note:
For Animal poses, you will have to do a change for your pose to work in the game:
Either you right click the clip and select "Details..." or you just press enter and you will see this window popup:
Note:
For Animal poses, you will have to do a change for your pose to work in the game:
Either you right click the clip and select "Details..." or you just press enter and you will see this window popup:

You will have to change the group number to 0x48000000 then press OK.
Check that the change appears:
Check that the change appears:

Remember that this is ONLY for animals!
You can now save your package and go test it in game.
You can now save your package and go test it in game.


The name you chose isn't important and can be changed at any time without affecting the pose. I could have named it 'Kilhian_Male poses' or even 'Male poses pack by Kilhian'. Press the "Save" button and the package will be now in the same folder as your animation.
Test in game
Place your package file into your Mods folder and load the game!
Make your character pose and look at it from the main angles to see if you can find a 'flaw' you can fix. If you want to improve you should keep working on a pose until it does look good. Broken/twisted joints should be fixed before you upload them for others :)
For better preview pictures, remember to use:
- moveObjects on to place your character/pet where you want them
- hideHeadlineEffects on

 RSS Feed